
Converting an extra room into a home theater effectively adds entertainment value to your house; ensure it is set up correctly!
Start with a television or projector; I recommend 4K because its images provide greater detail and reduce glare. In addition, you will require a surround sound amplifier that serves as a Bluetooth and WiFi control hub for device management.
TV
Converting an underutilized room into an advanced home theater can be an incredible way to impress friends and family alike. Although creating such an experience may seem complex, proper planning tips and smart ideas can turn any room into a movie-watching spot without breaking the bank.
Step one in creating a home theater system is purchasing a TV and an entertainment system or stand. Your options for TV types may include flatscreen HDTVs, LCDs, and even 3D versions – although most people opt for standard flatscreen sets instead.
Before setting up your new home theater system, unplug all devices – TV included! – to avoid potential electric shock. You should also remove power cords from components to decrease fire or overheating risks.
Attach your TV to an audio-visual (AV) receiver. Unlike a stereo receiver, which only handles two audio channels, an AV receiver offers surround sound for TV and speakers – making an upgrade worthwhile! You can find basic models for under $100, while more sophisticated ones support additional inputs and outputs.
Attach your AV receiver and television using HDMI cables, ensuring they are of high quality as indicated by “HDMI High-Speed” or “HDMI Ultra High-Speed.” These cables feature gold-plated connectors, which help provide an uninterrupted signal.
Most AV receivers come equipped with multiple ports for connecting various forms of video equipment, including DVD players and Blu-ray players, to the receiver. Most modern electronics also feature HDMI connections; however, older items featuring RCA (red, yellow, green, and blue) inputs or outputs may require cables to connect them to an AV receiver.
AV Receiver
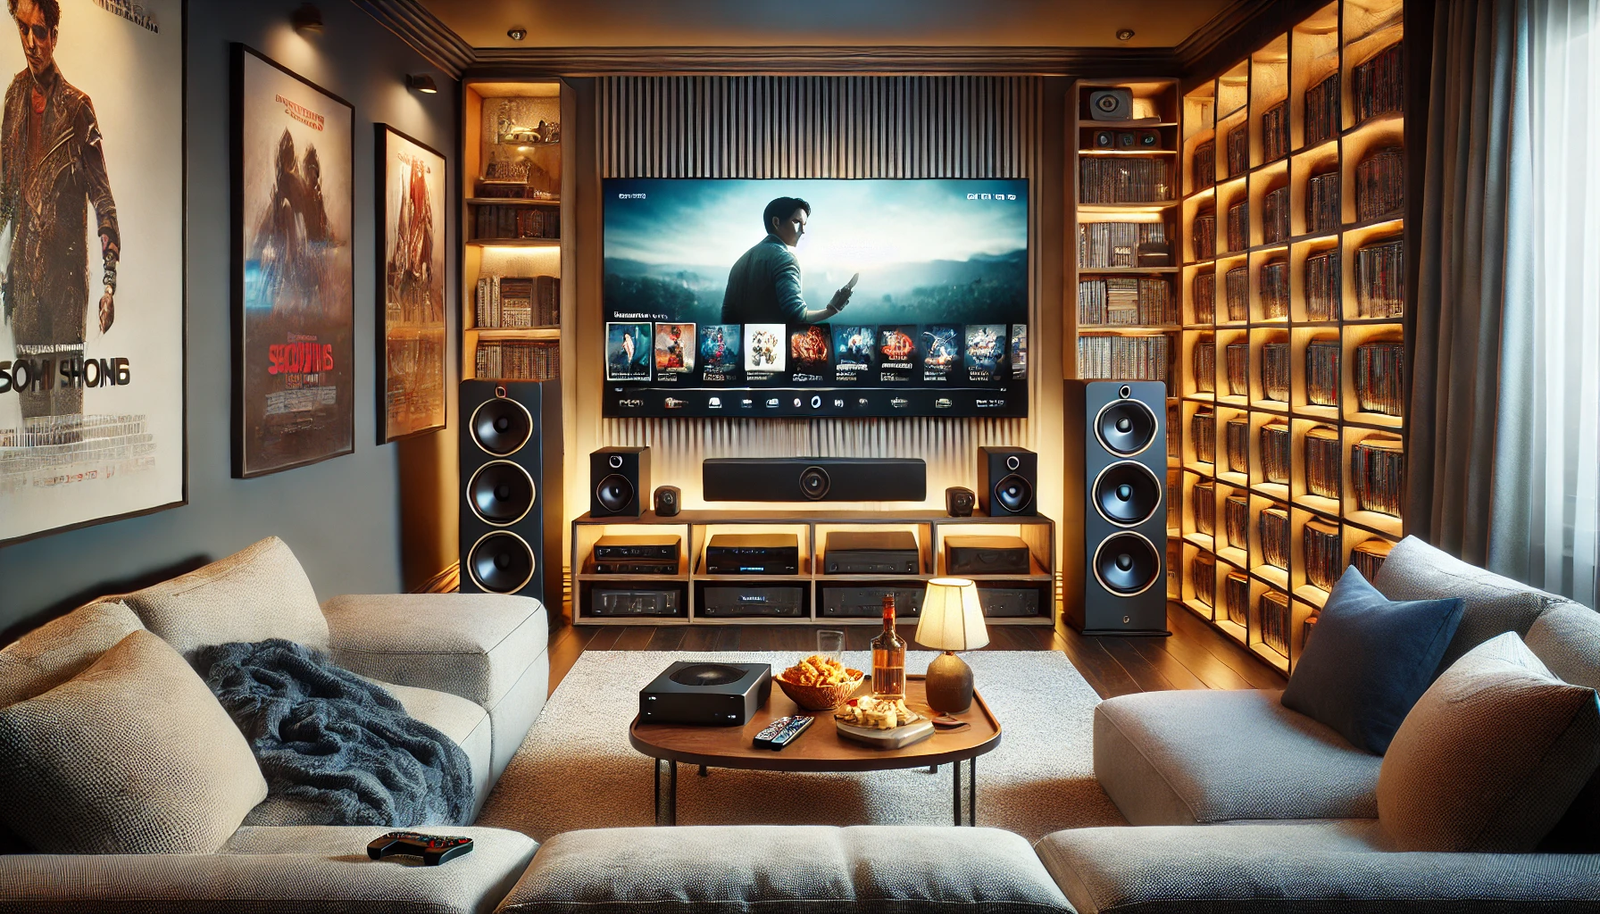
Home theater equipment hubs are essential in providing quality video and sound. Source components, like cable boxes, Blu-ray or DVD players, media streamers, and game consoles, connect to an AV receiver, which powers speaker systems and television sets. Although these connections may initially seem complex, understanding their inner workings helps make this experience more manageable.
Think of an AV receiver as the quarterback of your home theater setup. Its main responsibility is switching among all the audio/video sources you’ll be connecting, such as cable box, DVD player, gaming device, or streaming media service provider. Furthermore, it provides power to speakers and outputs that allow the connection of external amplifiers for additional rooms if desired.
An AV receiver should provide inputs for most components, but it should have as many HDMI inputs as possible for optimal results. HDMI is an industry-standard signal supporting HD and 4K video formats; using HDMI cables will minimize video transmission losses while guaranteeing compatibility among your components.
Your setup may require speakers with differing impedances (for instance, 8-ohm front speakers and 6-ohm surround speakers). In such a situation, look for an AV receiver capable of handling these conditions or consider external amplifiers to compensate.
Before beginning installation, ensure your AV receiver has the latest firmware available. Firmware updates address problems and enhance features to optimize performance – refer to its user manual for instructions when updating. To prevent wires becoming tangled or damaged during routing, carefully route all cables through your home using cable ties, Velcro straps or wire channels as needed to organize cables without them rubbing against each other. When necessary, use a stud finder to locate wall studs to avoid drilling into electrical wires – use cable ties, Velcro straps, or channels as necessary – make sure that any required drilling into electrical wires is avoided as necessary by routing carefully through each room when necessary using stud finders can help locate wall studs to avoid drilling into electrical wires using cable ties instead. To prevent wires from becoming tangled or damaged, ensure all cables are routed around each room – cable ties, Velcro straps, or channels can help organize cable organization to prevent wires from rubbing against each other when necessary. A stud finder may help locate wall studs when needed to avoid drilling into electrical wires when essential or use cable ties or Velcro straps/channels to organize and prevent rubbing against other cables/coils, coiling them through the home.
Speakers
Home theater systems rely heavily on speakers to deliver immersive audio and enhance the cinematic soundstage, so selecting and placing suitable components will help ensure the best experience. Choose appropriate speaker components according to their placement needs in your space to maximize enjoyment.
Assuming you already have left and right front speakers connected to your AV receiver, the next step should be connecting these to an amplifier or receiver. Depending on your budget and space constraints, floor standing, bookshelf, in-wall, or in-ceiling speakers best suit your space and decor. Remember that power handling, sensitivity, and frequency response specifications all play an integral part in how well speakers perform – the higher these specs are, the better they’ll perform.
The next step should be connecting the center channel speaker. A center speaker is essential to creating an immersive soundstage with dialogue and vocal effects, usually placed under or above your video display or behind an acoustically transparent projection screen and at ear height from your primary seat position. While traditional long and skinny models may work best under screens, you may also find in-wall and in-ceiling models for a sleeker appearance.
Add rear left and right surround speakers to complete your home theater system. These speakers reproduce ambient sounds, music, and special effects for an immersive sound experience. Surround speakers come in traditional bookshelf, satellite, in-ceiling, and Dolby Atmos configurations for maximum flexibility.
To ensure all connections are tight and secure, use sharp scissors to cut away the protective wax sheath surrounding each speaker wire, followed by using wire cutters or pliers to completely unwrap and peel it back off, exposing the bright copper wire that makes up the remaining part of each cable.
Subwoofer
Dependent on the size and layout of your room, adding a subwoofer may provide a rich bass sound that far surpasses anything available from built-in speakers or headphones. This upgrade can make a difference when watching movies or playing video games.
Before connecting a subwoofer, its placement must be optimized. Take advantage of the “subwoofer crawl” method: lie on the floor while playing your favorite bass-heavy music or movie scene and listen for areas where sound balance may be thin or imbalanced.
Once you have selected an ideal location for the subwoofer, ensure it is connected to and configured properly with your AV receiver. When testing it with media (DVD), press play; your system should automatically recognize it and adjust the volume appropriately.
Home theater systems typically have a center channel, surround speakers, and a powered subwoofer. More elaborate systems, like 9.1 surround sound, include additional height speakers that reflect sounds up into the ceiling for added depth to images on-screen. If using these, they should be mounted high along one wall, above two side-firing speakers.
Home theater speaker connections typically use RCA plugs; any available will likely be labeled front, center, and surround. When starting to set up your speakers in order, start with those that are easiest and move on to those that are more challenging – most speaker wire is coated in wax sheathing; use scissors or wire cutters to cut through this sheath and reveal its bright copper cable underneath before connecting it to its port using banana plugs (sometimes known as phono connectors).
Controls
Home theater technology has advanced drastically over the past several years, making it possible to transform any spare room into an amazing media room. Unfortunately, setting up a home theater can be daunting, requiring careful planning to get maximum results. However, with some helpful hints and useful ID, you can design one sure to amaze.
Start by purchasing a video source for your home theater system – from gaming consoles and Blu-ray players to televisions or projectors equipped with large display screens – to optimize viewing experiences and suit both room size and seating arrangements and the type of content planned to watch.
Invest in a high-quality surround sound speaker set to ensure the audio for your home theater system is as great as possible. Various kinds of speakers are on the market, but I recommend opting for a 5.1 setup for optimal listening experience. When connecting them to an AV receiver make sure each polarity connection is made in its appropriate order.
As part of your home theater setup, reducing the amount of light entering is important in preventing glare on the screen and detracting from what you’re watching. To combat this issue, install dimmable lighting and curtains/blinds that block out light around windows in your room and blackout curtains/blinds for any windows with windows in them – or take things one step further by installing automated lights you can control from your phone!